Knowledge base
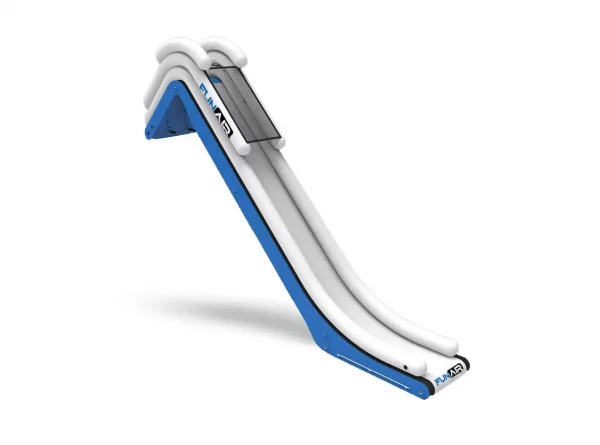
Yacht Slide
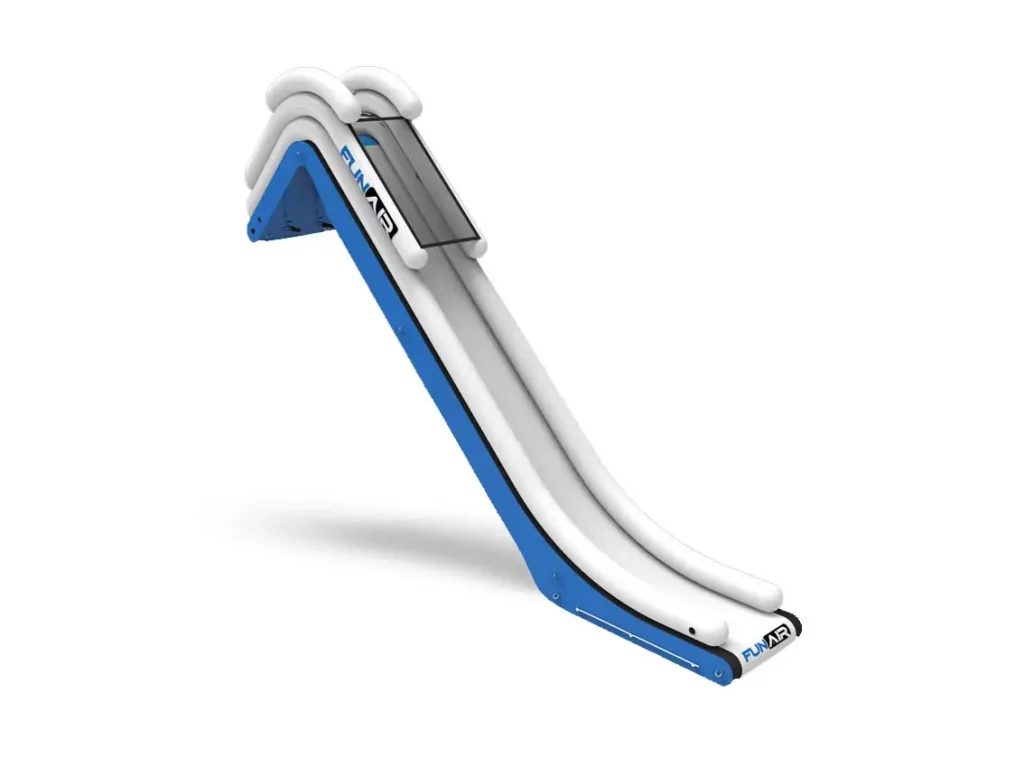
Here you can find additional resources and information about one of our most popular water toys – Yacht Slide.
Get it fixed
Yacht Slide Repair
Need help?
Learn about warranty, repairs and preventive maintenance for your Yacht Slide.
24H rapid service!
Talk directly via WhatsApp with one of our Seabob technicians.
How-to
Before using Yacht Slide for the first time, read through operation manual carefully, including the safety information and the instructions on proper use.
How to install Yacht Slide
How to inflate yacht slide
Your yacht slide has 1 inflation valve on the body, 6 on the arms and 5 on the stair steps. The body portion will also have 1 pressure relief valve (PRV) that actuates at 1.75 psi.
When inflating your slide, be sure that someone is manning the air pump at all times to prevent over inflation. The body of the product should be inflated to 1.75 psi and allowed to balance back to the point that the PRV will not release air.
A properly inflated slide component will feel very solid and firm to the touch. You should be able to slap it and hear a pinging sound. If you cannot locate your gauge, then you can fill up the product with air until the PRV starts to release air to prevent the popping or damaging of the internals of the product. Please note the PRV WILL NOT RELEASE air fast enough to prevent damage to the unit if someone is not paying attention to the air pump. This methodology of inflating your product works fine as long as you have a properly functioning PRV valve; therefore, play close attention using this method of inflation.
If in doubt, stop filling the slide and see if the PRV has started to release air. If the PRV is not releasing air, then continue to inflate the slide and monitor the PRV. If you find that the PRV is releasing air, stop inflating immediately, and allow the air to release. Once the pressure in the inflatable reaches the preset psi of the PRV, the valve will stop releasing air.
To inflate the 6 white tube arms, fill until very firm. There is no pressure release valve, so do not over inflate. The tubes should be hard and firm to the touch like the slide body.
Finally, to inflate the stair steps, hold the pump hose over the open valve until the bladder fills up with air. Again, the stair steps should be firm once filled with air.
PUMP
Our standard pump is 230v / 50 cycles with a European plug. The pump has an inflation and deflation port (FIG. 1).
Please connect the air hose to the proper port before turning the air pump on. The proper attachment to insert onto the hose and into the inflation valve is shown in (FIG. 2) & (FIG. 3).
During inflation, ensure the air valve is in the closed position by pushing on the stem to see it if depresses about 1/4 inch (FIG. 4). If it does not depress 1/4 of an inch, then rotate the stem 1/4 turn left, and it should pop out to a shut position. The valve is now closed. If the valve is open during inflation, then it will release air from the tube when the pump is removed.
During deflation, ensure valve is in open position so air will come out and product will deflate.
How to setup yacht slide
1. Make sure your FunAir® product is positioned with at least 10ft (3M) of clear space around all sides.
2. The slide is heavy and should be lifted to the intended installation deck using either a crane or an appropriate number of crew. If you are using a crane, please use the lifting rings that are provided on the exit, middle or entry of slide.
3. Determine proper length of rope needed to secure slide to yacht with lashing lines. Tie the rope to the D rings on the slide and secure to the yacht.
4. Try to straighten out the slide as much as possible prior to putting it over the side of the yacht.
Note: ALWAYS MAKE SURE the inflation valves at the side exit are closed before lowering the slide over the rail to the water.
5. Once the slide is set in position over the rail and hanging down the side of the yacht, inflate the body of the slide to 1.75 psi or until the Pressure Release Valve (PRV) actuates and releases air.
6. Next inflate the slide arms. Each side arm has an inflation valve on the end of the arm located on the entry of the slide. The arms do not have a PRV, so be careful not to over inflate them past 2.0 psi.
How to install yacht slide from the deployment deck
1. Tie the ropes to the inflatable rings provided for future lashing back to the ship. These ropes will be easier to reach during inflation. Refer to the anchoring instructions for clarification.
2. The body will weigh about 150 kg, so some strong crew members should handle it. Use a crane if available. Otherwise, use the lifting rings that are provided on the front and back of the slide. NEVER USE THE ANCHORING RINGS TO EVER LIFT THE SLIDE. THIS MAY DAMAGE THE SLIDE AND WILL VOID THE WARRANTY.
3. Try to straighten out the body on board as much as possible prior to putting it over the side of the ship.
4. The end of the body with the steps (entry) on it will stay on the deck and will sit on the railing, or other pre-determined location in the design phase of the slide. The other end (exit) should be fed over the side of the ship. Tie ropes to the lifting rings on the front of the slide to assist in lowering the slide down to the water.
5. Attach ropes on right and left side of the bottom of the transition that you’re lowering into the water. Use the closest ring to the slide body to make the connection. The other ring is used to lash back to the ship.
6. ALWAYS MAKE SURE THAT THE CARABINERS ARE SCREWED CLOSED AT ALL TIMES. When packing away, keep them closed to prevent loss. lash back to the ship.
7. Inflate the body. Never let the air pump run unsupervised. Continue to check air pressure with provided digital pressure gauge until it reads .08 psi. There is a PRV thatactivates when the pressure exceeds 0.8 psi. lash back to the ship.
8. Inflate the side arms. Each side arm has an inflation valve on the end of the arm located at the entry of the slide. The arms DO NOT have PRVs, so be careful not to over inflate them. They should be inflated to 1.0 psi and should feel very firm when full.
9. After the body is fully inflated and lashed back to the ship, it is time to inflate the stairs. The front of each step has a valve on it. Unscrew the valve cap where you will find a flap inside. Please do not play with the flap. Turn on one of the air pumps and direct the flow of air from the nozzle towards the flap in the valve. It is not recommended to place the hose top against the flap, just hold the hose end about 5 cm away from the opening. That will be sufficient to blow the air bladder up firm enough to step on. Repeat this process on all steps.
10. Close the hose chase around a hose connected to the ships water supply, and turn it on.
How to install yacht slide from storage deck below
1. Unroll slide out into the water.
2. Attach lashing ropes (see how to attach lashing ropes section) and tie back to the ship.
3. Inflate the body. Never let the air pump run unsupervised.
4. Inflate the side arms. Each side arm has an inflation valve on the end of the arm located at the entry of the slide. The arms DO NOT have PRVs, so be careful not to over inflate them.
5. Attach lifting harness to the designated anchor points.
how to install yacht slide – lifting harness
*Always connect the rings and pull the product in a direction that is a shearing direction and not a peeling direction.
(FIG. 1) below shows the proper direction of pull
(FIG. 2) shows a peeling direction of pull which should always be avoided.
how to install yacht slide – lifting rings
6. Float the slide around to the side of the yacht on which the slide will be used, using the lifting strap provided with the slide.
7. Using the ships crane, attach to the lifting harness. Lift the slide up into place, lash it back to the yacht.
8. Close the hose chase around a hose connected to the ships water supply, and turn it on.
How to attach lashing ropes
Lashing the slide back to the ship should be accomplished by following the image below and bringing the ropes back to secure cleats or some other solid lashing points. If securing to a top hand rail, please be sure the handrail will support the total weight of the slide and is of adequate construction to handle the load of operation.
A) – (2) lines should be lashed to cleats on the Sun Deck or, if the hand rail is strong enough, to the hand railing.
B) – (2) lines should be lashed to secure points on the owners deck, or 2nd level in most instances.
C) – (2) lines should be lashed back to the main deck cleats or capstan.
*Note: Lashing the slide back to the ship is required for safe operation. Be sure ropes are of good marine quality and all knots are tied securely. DO NOT operate inflatable in winds above 15 mph. If winds exceed 15 mph during operation, evacuate and deflate immediately. This is a calm waters toy.
How to retrieve Yacht Slide
How to retract Yacht slide without the crane
1. Deflate the slide fully with its designated pump (reverse pumpo), to ensure it shrinks to its smallest size. This will ensure easier handling, folding and prevent any potential damage.
2. Untie and remove the lines.
3. Allow at least 2 people on each deck and start lifting the slide at the same time.
Use the handles attached on the slide for better grip and easier operation.
4. Check and close all the valves and caps to prevent water ingress and valve damage
5. Rinse yacht slide with regular water.
6. Wipe and dry fully before folding.
7. 1st. fold the left and right side of the slide using handles as the break up point guidance.
Fold approx. 30-40 cm of the bottom part of the slide and start rolling towards the stairs.
*Use handles on the slide for better grip and easier operation
8. Put yacht slide in its designated bag.
How to retract Yacht slide to the garage
1. Deflate the side tubes.
2. Untie and remove the lines.
3. Detach and lower the slide with a crane to the water.
4. Float the slide around to swim platform / garage.
5. Pull the majority of the slide into the garage.
6. Fully deflate with its designated pump (reverse pumping).
7. Check and close all the valves and caps to prevent water ingress and valve damage
8. Rinse yacht slide with regular water.
9. Wipe and dry fully before folding.
10. 1st. fold the left and right side of the slide using handles as the break up point guidance. Fold approx. 30-40 cm of the bottom part of the slide and start rolling towards the stairs. *Use handles on the slide for better grip and easier operation
11. Put yacht slide in its designated bag.
General
How to make sliding surface slippery
Yacht slides have built in water sprayers located on side of the slide entry. The water sprayers have a unique universal hose fitting that will accept virtually any style of hose fitting. Insert the hose into the sprayer, secure it with the fitting, and turn on the water. The water will spray onto the slide slope. Turn the pressure higher or lower to adjust the flow.
How to move or relocate yacht slide
– Ensure the slide is in its designated bag before moving and relocating.
– The easiest way to move yacht slide, is by rolling it. This will prevent injuries due its weight.
How to repair Yacht Slide
How to replace the valve
– Completely fill air chamber that needs the valve replacement.
– Using a valve tool, loosen the valve by turning counter clockwise (Do not completely remove the valve or the boot that holds the valve to the tube will drop inside the air chamber and will be extremely hard to retrieve) and place back over the valve patch.
– Deflate the tube. Press against the material to hold the boot on the inside of the air chamber. Unscrew the valve the rest of the way and remove. Screw the new valve into place and achieve a “hand tight” fit.
– Re-inflate the tube and use the valve tool to tighten the valve fully. How-to patch a leak
How to patch a leak
While product is inflated, LOCATE THE LEAK or tear area.
If puncture is not easy to see, USE THE SOAPY WATER TEST. Mix up a soapy solution of 3 parts water to 1 part soap and apply liberally to the area of the product that may be leaking. The leak will create small bubbles.
CUT A PATCH TO FIT THE AREA. Cut the patch at least 1” larger on all sides than appears required for repair. Cut rounded edges on patches to ensure optimal repair quality. Pointed edges tend to lift and are difficult to glue fully.
CLEAN THE AREA with a cloth that contains rubbing alcohol.
MARK THE AREA FOR REPAIR with a marker, crayon or wax pencil and then deflate the product.
BRUSH PVC GLUE WITHIN THE MARKED AREA ON INFLATABLE. Spread a consistent amount of glue over the patch area. Let dry completely.
REPEAT STEP 6 on the back of the patch. Let dry completely. Wet Glue patches will not stick to another wet glued area.
ASSEMBLE THE HEAT GUN OR HAIR DRYER AND SQUEEGEE.
Once the glue on the patch and the area requiring repair on the inflatable are dried, the color will change to a matte finish.
WARM THE GLUED AREAS WITH A HEAT GUN TO ACTIVATE THE GLUE. The glued area should be warm to the touch, but not hot.
PRESS THE PATCH EVENLY ONTO THE DAMAGED AREA. Make sure you are working on a smooth, hard surface underneath the inflatable.
USE THE SQUEEGEE TO WORK OUT ALL AIR BUBBLES. Start from the center of the patch and smooth your way to the edges in all directions.
THE PATCH IS FINISHED. Wait 24 hours before inflating the product.
After 24 hours, inflate the product to INSPECT THE REPAIR. Brush the soapy solution over the repaired area to check for leaks. If bubbles appear near the repair, repeat the repair process with a larger patch.
CHECK FOR VALVE LEAKS. Rarely, an inflatable product has been rolled so tightly that it can cause the backing nut of the Inflation Valve or Pressure Relief Valve to become loose. In this case, place the soapy solution on the edges of the valve to check for leaks. Small bubbles indicate valve-tightening is required. Use valve-tightening tool included in the Accessory Kit to re-tighten valve.
TIGHTEN THE VALVE. Once inflatable is deflated, place valve-tightening tool (included with the inflatable) on top of valve stem and turn left to loosen. Use other hand to hold the nut in place while adjusting. Replace valve and re-tighten to right with tool.
Maintenance
Before storing your Yacht Slide, be sure to clean and dry it before deflating it.
Maintenance Guidelines
General Maintenance
– Inspect yacht slide regularly for potentially unsafe conditions, particularly after storms..
– Clean product regularly as instructed in the cleaning section.
– Ensure storage area is dry and rodent free.
– Always remove inflatable from the water when not in use.
– Keep inflatable out of sunlight when not in use to extend the life of your inflatable.
– It is recommended to use UV protection suitable for PVC.
Cleaning
– To clean, we advise to use a very soft bristle brush or sponge with warm water and an environmentally friendly, biodegradable soap. Rinse with cold fresh water and allow to dry fully before packing and storing.
– Ensure to wash out the stairs, removing any seaweed, sand or dirt.
Storage
– Avoid storing Yacht Slide whilst it is damp. It needs to be fully dry to prevent mildew forming and stop it from smelling unpleasant.
– Always store your yacht slide in its designated bag.
– Never store your Yacht Slide near chemicals or corrosive products.
– Do not roll the product extremely tight so damage does not occur to seams or valves. As shown in the pictures on this page, your product can be flaked into a compartment for storage.
Safety
– Do not DIVE or JUMP from the top of this slide, down the slide path, as serious injury could result.
– The No Jump netting at the top of the slide should be used at all times and should not be removed for any reason.
– Be sure the previous rider has left the slide path area before the next rider begins their descent down the slide.
– Riders should always slide FEET FIRST down the slide. NEVER go down the slide HEAD FIRST.
– Yacht slide is a sealed air product and should be treated with great care when handled.
– Do not drag the slide on the ground, or over sharp objects when handling. Slight punctures could happen resulting in air leaks.
– The Body is tethered to the slide with lashing ropes. These lines are designed to be comfortably loose to allow for independent movement of the body and during minor swells.
– Do not operate in rough water conditions.
– If the water is choppy, or if the wind exceeds 15 mph, DO NOT use the slide.
Need help?
Ask for support
Reach out for personalized quotations or special arrangements.
Email[email protected]Phone
+33 781 15 12 54
Send an inquiry instead
Alternatively fill out the form and send us an inquiry. We will come back to you the old fashioned way. In a flash!
Subscribe to our Newsletter
Stay informed
Receive Special offers and stay informed about the latest developments in the world of Water Toys.
In order to understand how we use and protect your personal information, please read our privacy policy.
Water toy rentals. Both sides of The Atlantic
We deliver. Anytime. Anywhere.
Trusted By


For over a decade, Ocean Premium has been providing water toy rentals to yachts and charter brokers. By consistently incorporating feedback from our clients and partners, we have honed our services to achieve excellence. The continuous collaboration with several hundred yachts attests to our superior performance.

Ships Worldwide

Best Prices

Need Advice