Best way to set up a Tiwal in 8 steps
Best way to set up a Tiwal in 8 steps
Tiwal Set-Up – simple explanation:
Step 1: Partially inflate the hull.
Step 2: Install the daggerboard case into the hull.
Step 3: Assemble the framework. With just a few clicks, the elements fit together easily.
Step 4: Attach the framework to the hull using the hook and loop straps.
Step 5: Complete inflation using the manual pump. This should inflate to 11psi/0.75 bars.
Step 6: Assemble the pieces of the mast, attach the sail onto the hull, and prepare the ropes.
Step 7: Fasten everything onto the framework.
Step 8: GET SAILING!
Tiwal Set-Up – detailed explanation:
Unpacking:
There are two bags that carry all the equipment needed for set-up.
(Size = 5 feet by 16″ by 14″ / 152cm by 40cm by 35cm)
(Weight = 62lbs / 28kg)
Bag 1 contains the inflatable hull, while bag 2 contains all the aluminium parts that form the structure of the boat (rudder; daggerboard; sail; and the mast).
STEP 1
Putting the hull into shape:
We start by unpacking the hull, loosening the security straps and unrolling it. (The recommended inflated hull is 11psi/0.75 bars.) To inflate the hull we use the low pressure pump accompanied with the bag, and we inflate to about 8.8psi/0.6 bars (80%). We check that the yellow spring loaded button is in the DOWN position, and make sure not to inflate to the maximum just yet. Once it is inflated to 8.8psi/0.6 bars, we quickly push down and turn the yellow spring loaded button and make sure it is now in the UP position. This closes the valve. There are two valves on the hull, each corresponding to a separate compartment.
STEP 2
Now we unpack the second bag containing the structure.
The first piece that we’ll put in place will be the daggerboard case. Place the daggerboard well so that the well goes into the hull, while the mast pole faces upwards and towards the bow (front). We position it and align it with the buckles and the stainless steel rings.


STEP 3
Assembling the framework:
The reinforcement arms and the wings have yellow and black caps. The yellow caps go on the left and the black caps go on the right. This helps to show you which way round they go. To connect them, press onto push-pin while sliding the arms on.


STEP 4
Now fix the structure onto the hull with the velcro strips. Position the frame so that it is visually in the centre of the boat. Make sure to strap the velcro well, as this will ensure that the frame will be stable.
STEP 5
Fully inflate the hull using a manual pump. This should inflate to 11psi/0.75 bars. Once it is inflated, it should feel as hard as a traditional boat.
STEP 6
To prepare the rigging, we take out the sail and unroll it. The Tiwal offers two sail sizes, one large and one small, however we only use one at a time. Next we take 3 battens for the large sail and 2 for the smaller sail and slip them into the batten pockets. For the boom, position each polyester tube into the bottom of the sail, each entering from the opposite direction.
The mast is composed of 5 carbon sections. Join them together then push it into the side pocket of the sail. Clip the boom onto the mast and the sail should be ready.


Pick up the sail and place the mast onto the mast pole. When performing this step, make sure to turn the sail into the wind for sufficient leverage.
Attach the ropes like this:


STEP 7
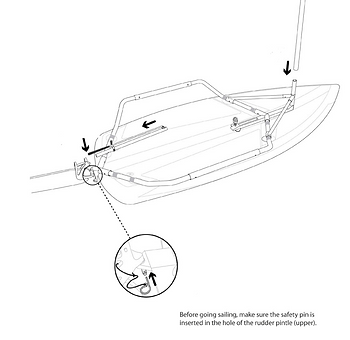
Attach the tiller onto the rudder using the same push-pin system. Then attach the rudder onto the hull and clip it with the pin to avoid losing it. (This is very important).


STEP 8
The Tiwal is now ready to be placed in water. Once it is in the water, let down the tiller and place the daggerboard into the daggerboard well.
Note:
– Don’t forget to place the rubber around the daggerboard to prevent it from slipping.
– Make sure the drain valve (located below the hull) is closed.
And There! You’re All Ready To Go!
