Knowledge base
Nautibuoy
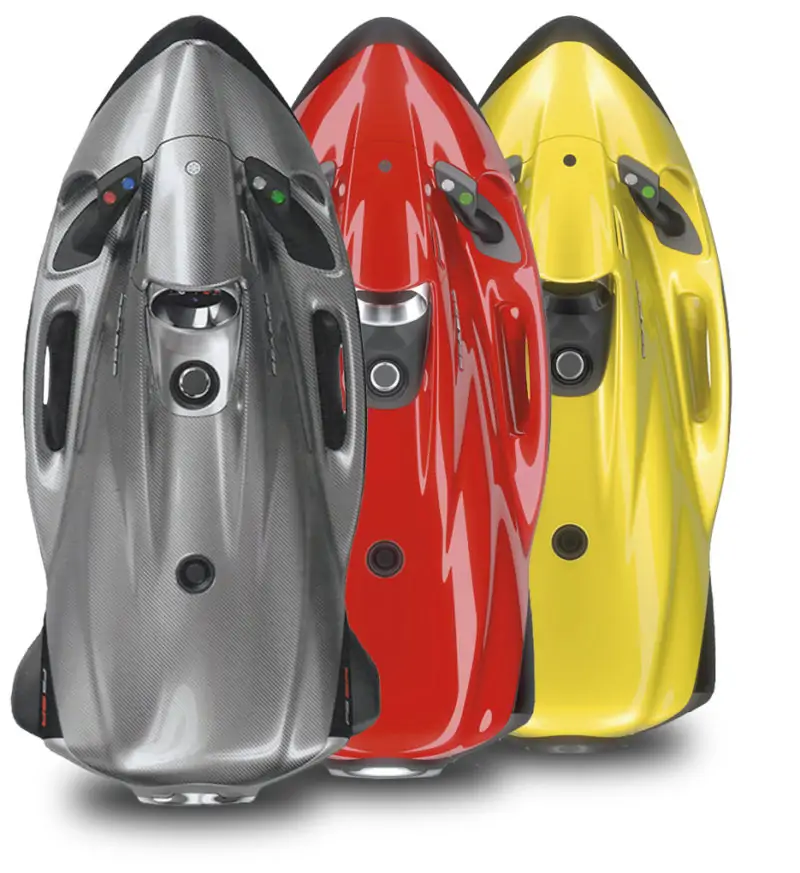
Here you can find additional resources and information about one of our most popular water toys – Nautibuoy.
Get it fixed
Nautibuoy Repair

Need help?
Learn about warranty, repairs and preventive maintenance for your Nautibuoy
24H rapid service!
Talk directly via WhatsApp with one of our Seabob technicians.
How-to
Before attempting to use Nautibuoy platform for the first time, read the manual and pay special attention to the warnings and disclaimers. Most injuries can be avoided by using proper technique when learning.
Deployment
How to install the Bautibuoy platform
PLATFORM
1. Choose a location where the Platform can be unrolled onto a dry surface, free of grease, liquids or sharp objects, with access to an electrical outlet or extension cord. Ideally the set up should be somewhere near to the water’s edge where you intend to launch. The space required is dependent upon your chosen Platform size.
2. Once in position, remove the Platform from the bag and unfold completely, locating the main inflation valve.
3. Remove the cap from the inflation valve by twisting anti clockwise and ensure the one way valve is shut by pressing the white button in the centre of the valve until it pops out.
4. Attach the pump and ensure that it is in inflate mode before you start inflating.
5.To obtain an even more rigid platform, you can use the stirrup pump to further inflate it up to 5.5Psi.
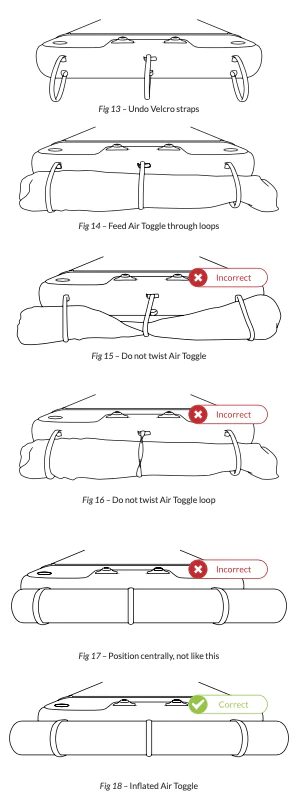
6.OncethemainbodyofthePlatformhasbeeninflated,the user must attach the Air Toggle’s to provide a 2nd and 3rd air chamber for safety.
INFLATING AIR TOGGLES
1. Undo the Velcro fastenings on the Air Toggle loops you require to use at either end or on either side of the Platform (Fig 13). Always keep the Air Toggle loops not in use securely fastened.
2. Feed the Air Toggle into the chosen open Air Toggle loops (Fig 14) ensuring the Air Toggle loop isn’t twisted (Fig 16).
3. Also ensure that the actual Air Toggle isn’t twisted (Fig 15) and is positioned centrally (Fig 18) rather than off centre (Fig 17). 4. Check that the Air Toggle is in place (Fig 14)
5. Inflate Air Toggle with stirrup pump.
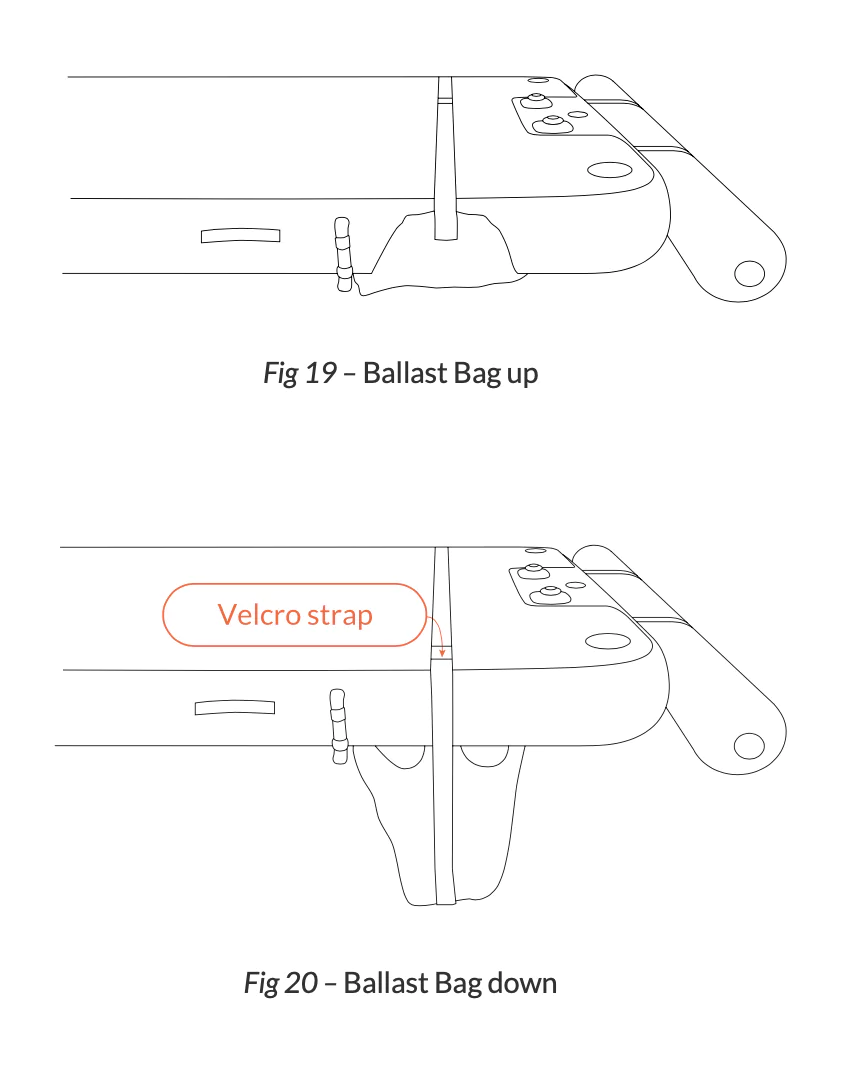
PREPARING THE BALLAST BAGS
1. Place each Ballast Bag in the down position by removing the Ballast Bag strap from the Velcro strip on top of the Platform (Fig 19).
2. Deploy the Ballast Bags and reattach the Velcro straight 5cm/2” from the end of the Platform (Fig 20).
3. Ensure each Ballast Bags is in the down position and able to fill (Fig 20) and ensure the Velcro straps are secure.
SECURING PLATFORM TO THE VESSEL
1. Ensure a dock line is attached securely to the Platform using one of the four D-rings using a cow hitch.
2. Before deploying the Product, ensure the loose end of the Dockline is attached securely to a solid cleat on the vessel using the OXO method.
Tying a cow hitch:
1. Push spliced loop of Dock Line through the stainless D ring (Fig 21).
2. Pass the other end of the Dock Line through the spliced loop (Fig 22).
3. Pull all the of the remaining Dock Line through the spliced loop until it is tight (Fig 23).
OXO method:
1. Make one full turn around the cleat in a clockwise direction and pull tight (Fig 24).
2. Then on top of the full loop make a figure of eight and pull tight (Fig 25).
3. Make one more full loop in a clockwise direction and pull tight, for added security add one more full loop (Fig 26).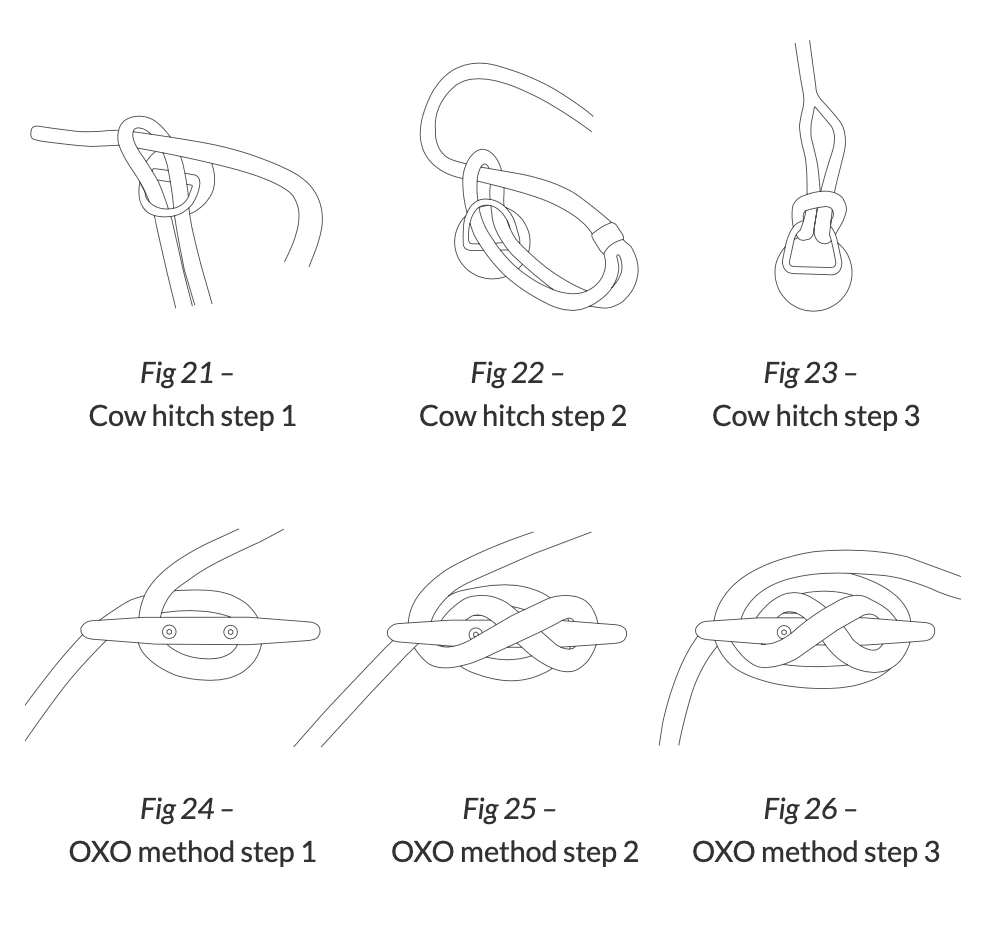
PLATFORM DEPLOYMENT
1. Never drag the Product. Always lift using the horizontal handles or the D-rings provided to avoid any accidental tearing or abrasion.
2. To deploy the Platform, have at least 2 people evenly spaced around it to carry it and simply lift the Platform into the water.
3. Do not board the Product before the Ballast Bags are full. Once the Platform has been deployed, allow at least 1 minute for the Ballast Bags to fill with water. Before boarding the Platform, double check all 4 Ballast Bags are full.
4. We recommend that the Ladder be installed before boarding to allow users an easier exit from the water. Please see the Ladder manual for instructions.
How to uninstall the Bautibuoy platform
EMPTY THE BALLAST BAGS
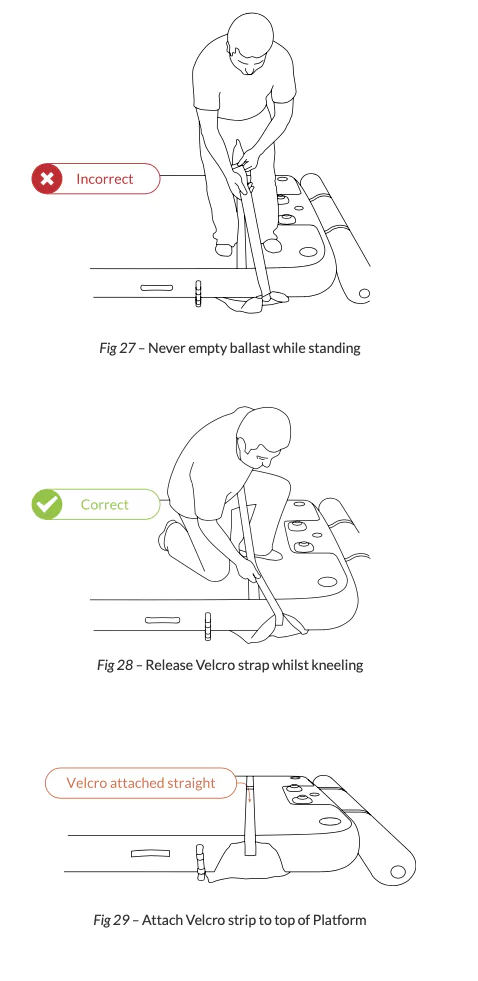
1. Get into a kneeling or seated position where you can reach the top of the strap easily. Never stand whilst emptying the Ballast Bags (Fig 27).
2. Release the top of the strap from the Velcro strip on top of the Platform (Fig 28).
3. Pull the strap all the way up until you see the lower piece of Velcro positioned near the ballast bag.
4. Attach the lower Velcro securely onto the Velcro strip on the top of the Platform (Fig 29).
5. The ballast bag will now be empty and pressed against the side of the Platform (Fig 29).
6. Repeat the process for all four Ballast Bags.
7. Care must be taken whilst on the Platform and when transferring from the Platform to the vessel.
REMOVING PLATFORM FROM THE WATER
1. Ensure all four Ballast Bags are in the up position and the straps are securely attached to the Velcro strips on top of the Platform.
2. Have at least 2 people evenly spaced around the Platform to easily lift it out of the water.
3. Once platform is safely on board, the dock line can be released & removed.
4. Rinse wash the platform with soap and fresh water & dry before deflating.
PLATFORM DEFLATION
1. Always ensure the Product is put away clean and dry. 2. Lie the Platform out on a clean, dry and grease free surface. 3. Deflate both Air Toggles by pressing the white button in the centre of the valve until it stays down (Fig 30). The air will then be released. 4. Remove the Air Toggles from the Air Toggle loops and allow the loops to dry before securing back with the Velcro.
5. Switch on the pump and deflate the platform. Switch off the pump once all the air has been removed from the platform. It is important to remove all the air from the chamber as any air left may freeze and cause damage to the platform.
6. Make sure the Air Toggles are completely deflated and dry and ensure the valve caps securely shut.
7. The Ballast Bag strap Velcro should be connected to the Velcro strip on the Platform in either the up or down position before rolling.
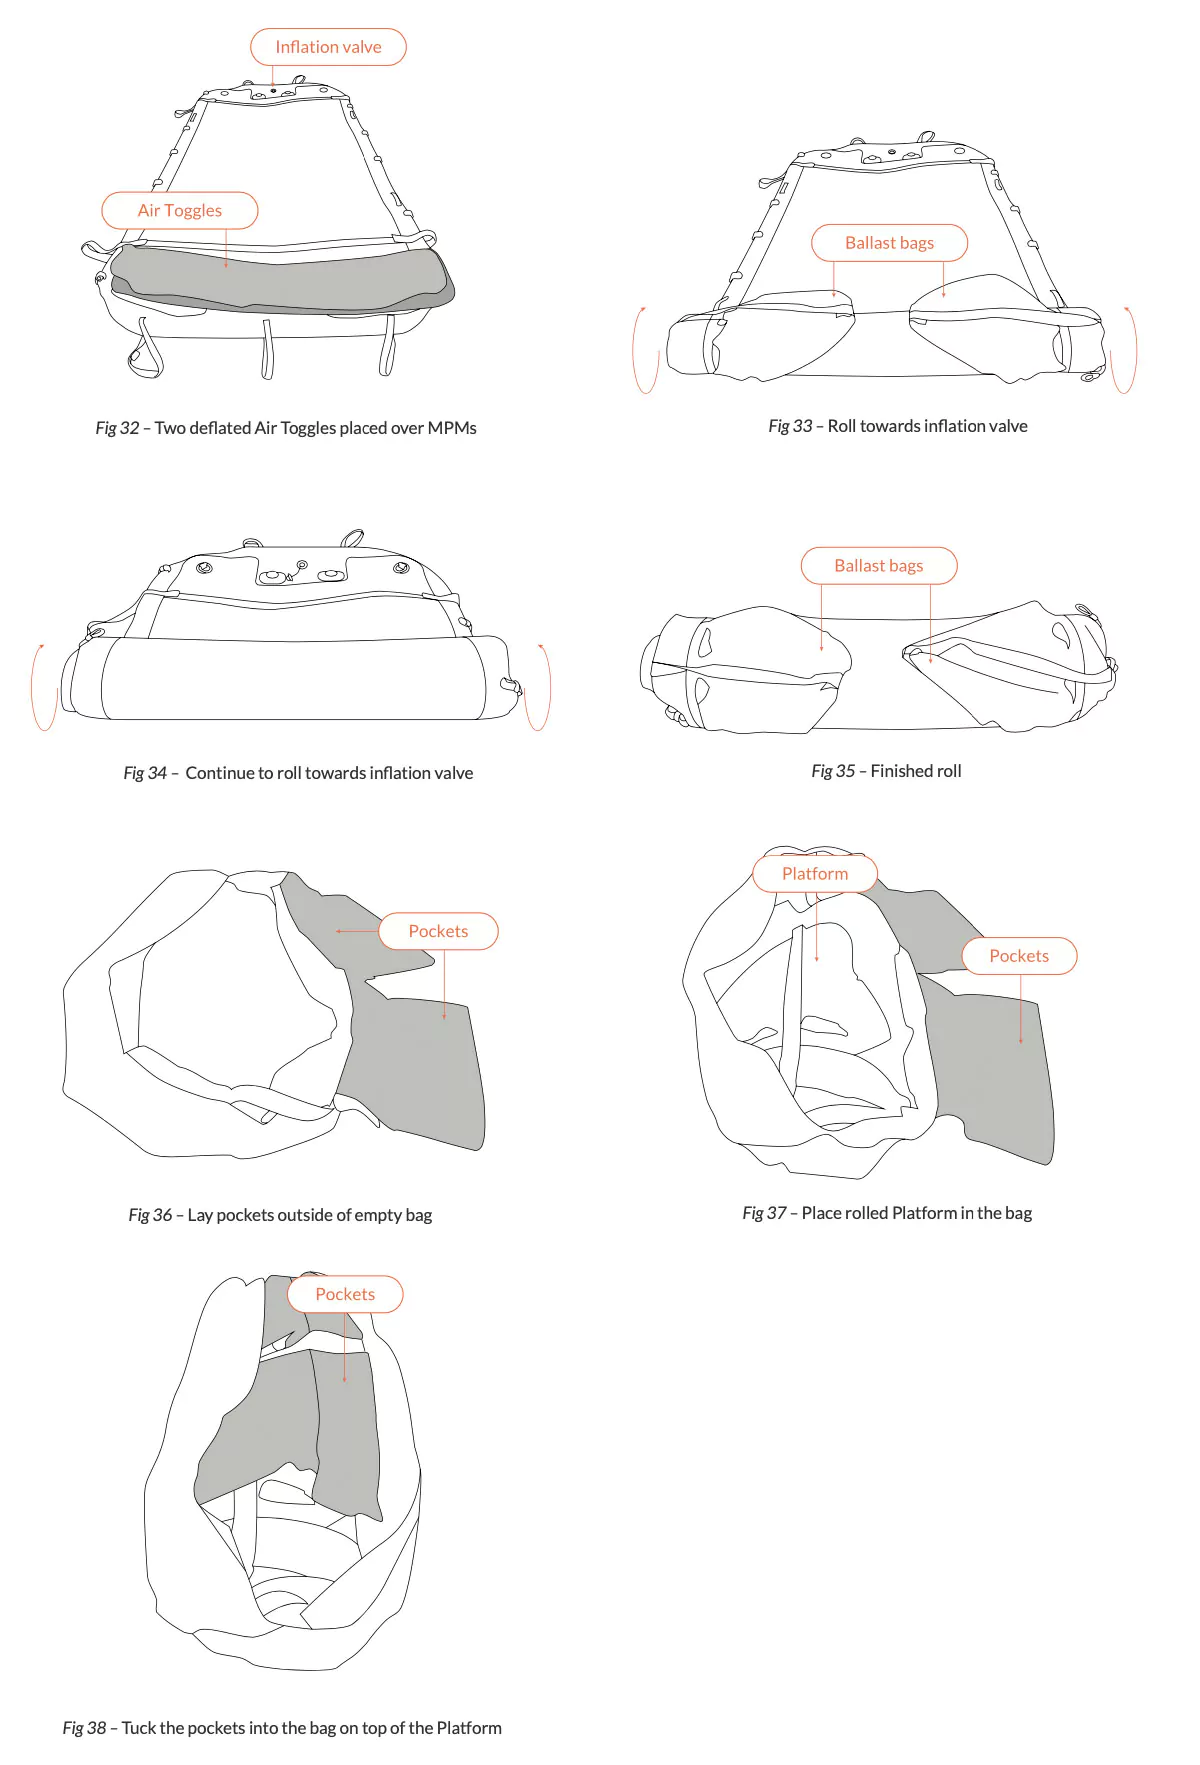
8.Lay the two deflated Air Toggles across the Platform at the opposite end to the inflation valve. This is important so any excess air can be pushed out as you roll the Platform (Fig 32). Position the Air Toggles so they are laid over the multi-purpose Platform mounts (MPM’s), by doing this you protect the foam from any marks or dents.
9. As you roll the platform up, position the Ballast Bags so they are flat against the rolled platform (Fig 33).
10. Starting at the end containing the Air Toggle’s, roll the Platform around the Air Toggles from one end to the other, making sure the roll is straight and as tight as possible (Fig 33).
11. It is important to roll the Platform to protect the foam from any damage or creases. Never fold the Platform. This can damage or crease the foam which could affect the aesthetics and functionality of the foam.
12. Ensure to close the inflation valve on the Platform to prevent air from leaking back into the chamber.
12. Once the platform has been fully rolled it can be placed back into the bag, before doing so ensure the bag is fully open with the pockets facing out see (Fig 36). NEVER store uncovered or out of the bag.
How-to repair Nautibuoy platform?
How to replace the valve
– Completely fill air chamber that needs the valve replacement.
– Using a valve tool, loosen the valve by turning counter clockwise (Do not completely remove the valve or the boot that holds the valve to the tube will drop inside the air chamber and will be extremely hard to retrieve) and place back over the valve patch.
– Deflate the tube. Press against the material to hold the boot on the inside of the air chamber. Unscrew the valve the rest of the way and remove. Screw the new valve into place and achieve a “hand tight” fit.
– Re-inflate the tube and use the valve tool to tighten the valve fully.
How to patch a leak
– Locate tear or hole and mark its location.
– Cut correct type of fabric patch with round corners allowing a minimum 5cm overlap around the hole/tear.
– Place the patch over the hole and mark around the patch with a pencil/removable marker pen.
– Clean/prime the rear of the patch and also the area needing repair, using a clean dry lint-free cloth, by wiping with Acetone. Wait until all of the Acetone has evaporated. (PVC will become tacky).
– Mask the area to be repaired with masking tape to avoid unsightly adhesive overspill when applying the adhesive.
– Ensure to allow a 3mm/1/8”gap around the pencil mark to allow for stretch in the patch when applied.
– Mix the adhesives as per the instructions that were supplied with the adhesives.
– Using a brush, apply an even, thin coat of adhesive to both the rear of the external device patch and the masked repair area, leave to dry for at least 20 minutes, apply a second and third coat, leaving each coat to dry for 2 minutes or until tacky, apply the patch carefully to the repair area.
– Smooth down the patch firmly using a seam roller or rounded object, working from the centre of the patch outwards, in order to remove air bubbles and ensure good contact.
– If the patch is not sticking in areas or air bubbles remain, then the area can be gently heated with a hot air gun or hairdryer and ‘re-worked.
– Remove the masking tape and clean off any excess adhesive with the Acetone to prevent unsightly brown stains.
– Place a smooth sided heavy weight on the patch and allow to ’cure’ for 24hours before reinflating to check that the repair has been successful and before re-launching the platform or device.
Maintenance
Before storing your Nautibuoy platform, be sure to clean and dry it before deflating it.
Guidelines
Cleaning
– To clean, we advise to use a very soft bristle brush or sponge with warm water and an environmentally friendly, biodegradable soap. Rinse with cold fresh water and allow to dry fully before deflating and storing.
– Regularly clean all of the Velcro with a soft brush and a low pressure stream of water from a domestic hose.
– Ensure to wash out the interior of the Ballast Bags, removing any seaweed, sand or dirt.
– NautiBuoy recommends the periodic application of Hypalon conditioner to the side walls and ballast bags to help protect and clean the platform.
Storage
– Avoid storing the product whilst it is damp. This will prevent mildew forming and stop the Platform from smelling unpleasant.
– The teak foam surface must be handled with care. Ensure never to fold it and always roll the Platform to avoid creasing. Never drag sharp items over the surface. This will tear or scratch the foam.
– Never store your platform near chemicals or corrosive products.
Documents
- Nautibuoy user manual – all platforms
- Nautibuoy 375 Platform
- Nautibuoy 525 Platform
- Nautibuoy 675 Platform
- Nautibuoy 800 Platform
Configurations
Configuration manuals
- most popular configurations
- Jetski Dock (T-shape) – Nautibuoy 375 + 525
- Jetski Dock (T-shape) – Nautibuoy 375 + 800
- Jetski Dock (T-shape) – Nautibuoy 525 + 525
- Jetski Dock (T-shape) – Nautibuoy 525 + 675
- Jetski Dock (T-shape) – Nautibuoy 525 + 800
- Jetski Dock (T-shape) – Nautibuoy 675 + 525
- Jetski Dock (T-shape) – Nautibuoy 675 + 675
- Jetski Dock (T-shape) – Nautibuoy 675 + 800
- Quad Platform – Nautibuoy 675 + 675 + 675 + 675
- Tri-Platforms- Nautibuoy 675 + 675 + 675
- Tri-Platforms – Nautibuoy 675 + 800 + 800
- Jetski Dock (T-shape) – Nautibuoy 800 + 375
- Jetski Dock (T-shape) – Nautibuoy 800 + 525
- Jetski Dock (T-shape with C-Dock + L-Bow) – Nautibuoy 800 + 525 + C-Dock + L-Bow
- Jetski Dock (T-shape) – Nautibuoy 800 + 675
- Jetski Dock (T-shape) – Nautibuoy 800 + 800
- Tri-Platforms – Nautibuoy 800 + 800 + 800
- Tri-Platforms – Nautibuoy 800 + 800 + 675
- Quad Platform – Nautibuoy 800 + 800 + 800 + 800
- Water Sports Station – Nautibuoy 800 + 525 + 2x C-Dock + 2x L-Bow
Need help?
Ask for support
Reach out for personalized quotations or special arrangements.
Emailsales@oceanpremium.comPhone
+33 766 61 81 92
Send an inquiry instead
Alternatively fill out the form and send us an inquiry. We will come back to you the old fashioned way. In a flash!
Subscribe to our Newsletter
Stay informed
Receive Special offers and stay informed about the latest developments in the world of Water Toys.
In order to understand how we use and protect your personal information, please read our privacy policy.
Water toy rentals. Both sides of The Atlantic
We deliver. Anytime. Anywhere.
Trusted By


Ocean Premium has been supporting yachts and charter brokers with water toy rentals for over a decade. Constantly improving on the feedback of our clients and partners gives us the edge to excel at what we do. Several hundred yachts we work with continuously prove this.

Ships Worldwide

Best Prices

Need Advice