Knowledge base
Aquapark
Here you can find additional resources and information about one of our most popular water toys – Aquapark.
Get it fixed
Aquapark Repair
Need help?
Learn about warranty, repairs and preventive maintenance for your Aquapark
24H rapid service!
Talk directly via WhatsApp with one of our Seabob technicians.
How-to
Before using aquapark for the first time, read through operation manual carefully, including the safety information and the instructions on proper use.
General
How to move or relocate heavy inflatables
- Ensure the aquapark is in its designated bag before moving and relocating.
- The easiest way to move the item, is by rolling it.
This will prevent injuries due its weight.
How to calculate minimum water depth
You can calculate the minimum water depth using the following formula:
Height of product (cm) + Average Height of a Person (186cm) / 2
Example:
Jungle jim height (210 cm) + user height (186 cm) / 2 = minimum water depth (198 cm)
How to pack up and store my aquapark
– Deflate the product, preferably using the reverse mode of an electric pump or shop vacuum, ensuring that all air is removed.
– Fold the inflatable into the desired storage width (usually into thirds) and roll it up.
– Wrap the inflatable in a protective cover, such as a tarp, and secure tightly with rope or straps.
– Store the product out of direct sunlight and protected from the environment in a clean, dry place. It is best to store it inside a closed container with moth balls to prevent rodent damage.
– Never store in a damp location or directly on concrete.
– Never store at temperatures below 40 degrees Fahrenheit (5 degrees Celsius) or in an area with broad temperature fluctuations.
How to remove air from aquapark elements
When storing your aquapark pieces away for the off-season, you want to remove all of the air. The best way to accomplish this is by using the reverse mode of an electric pump to ensure that all air is removed.
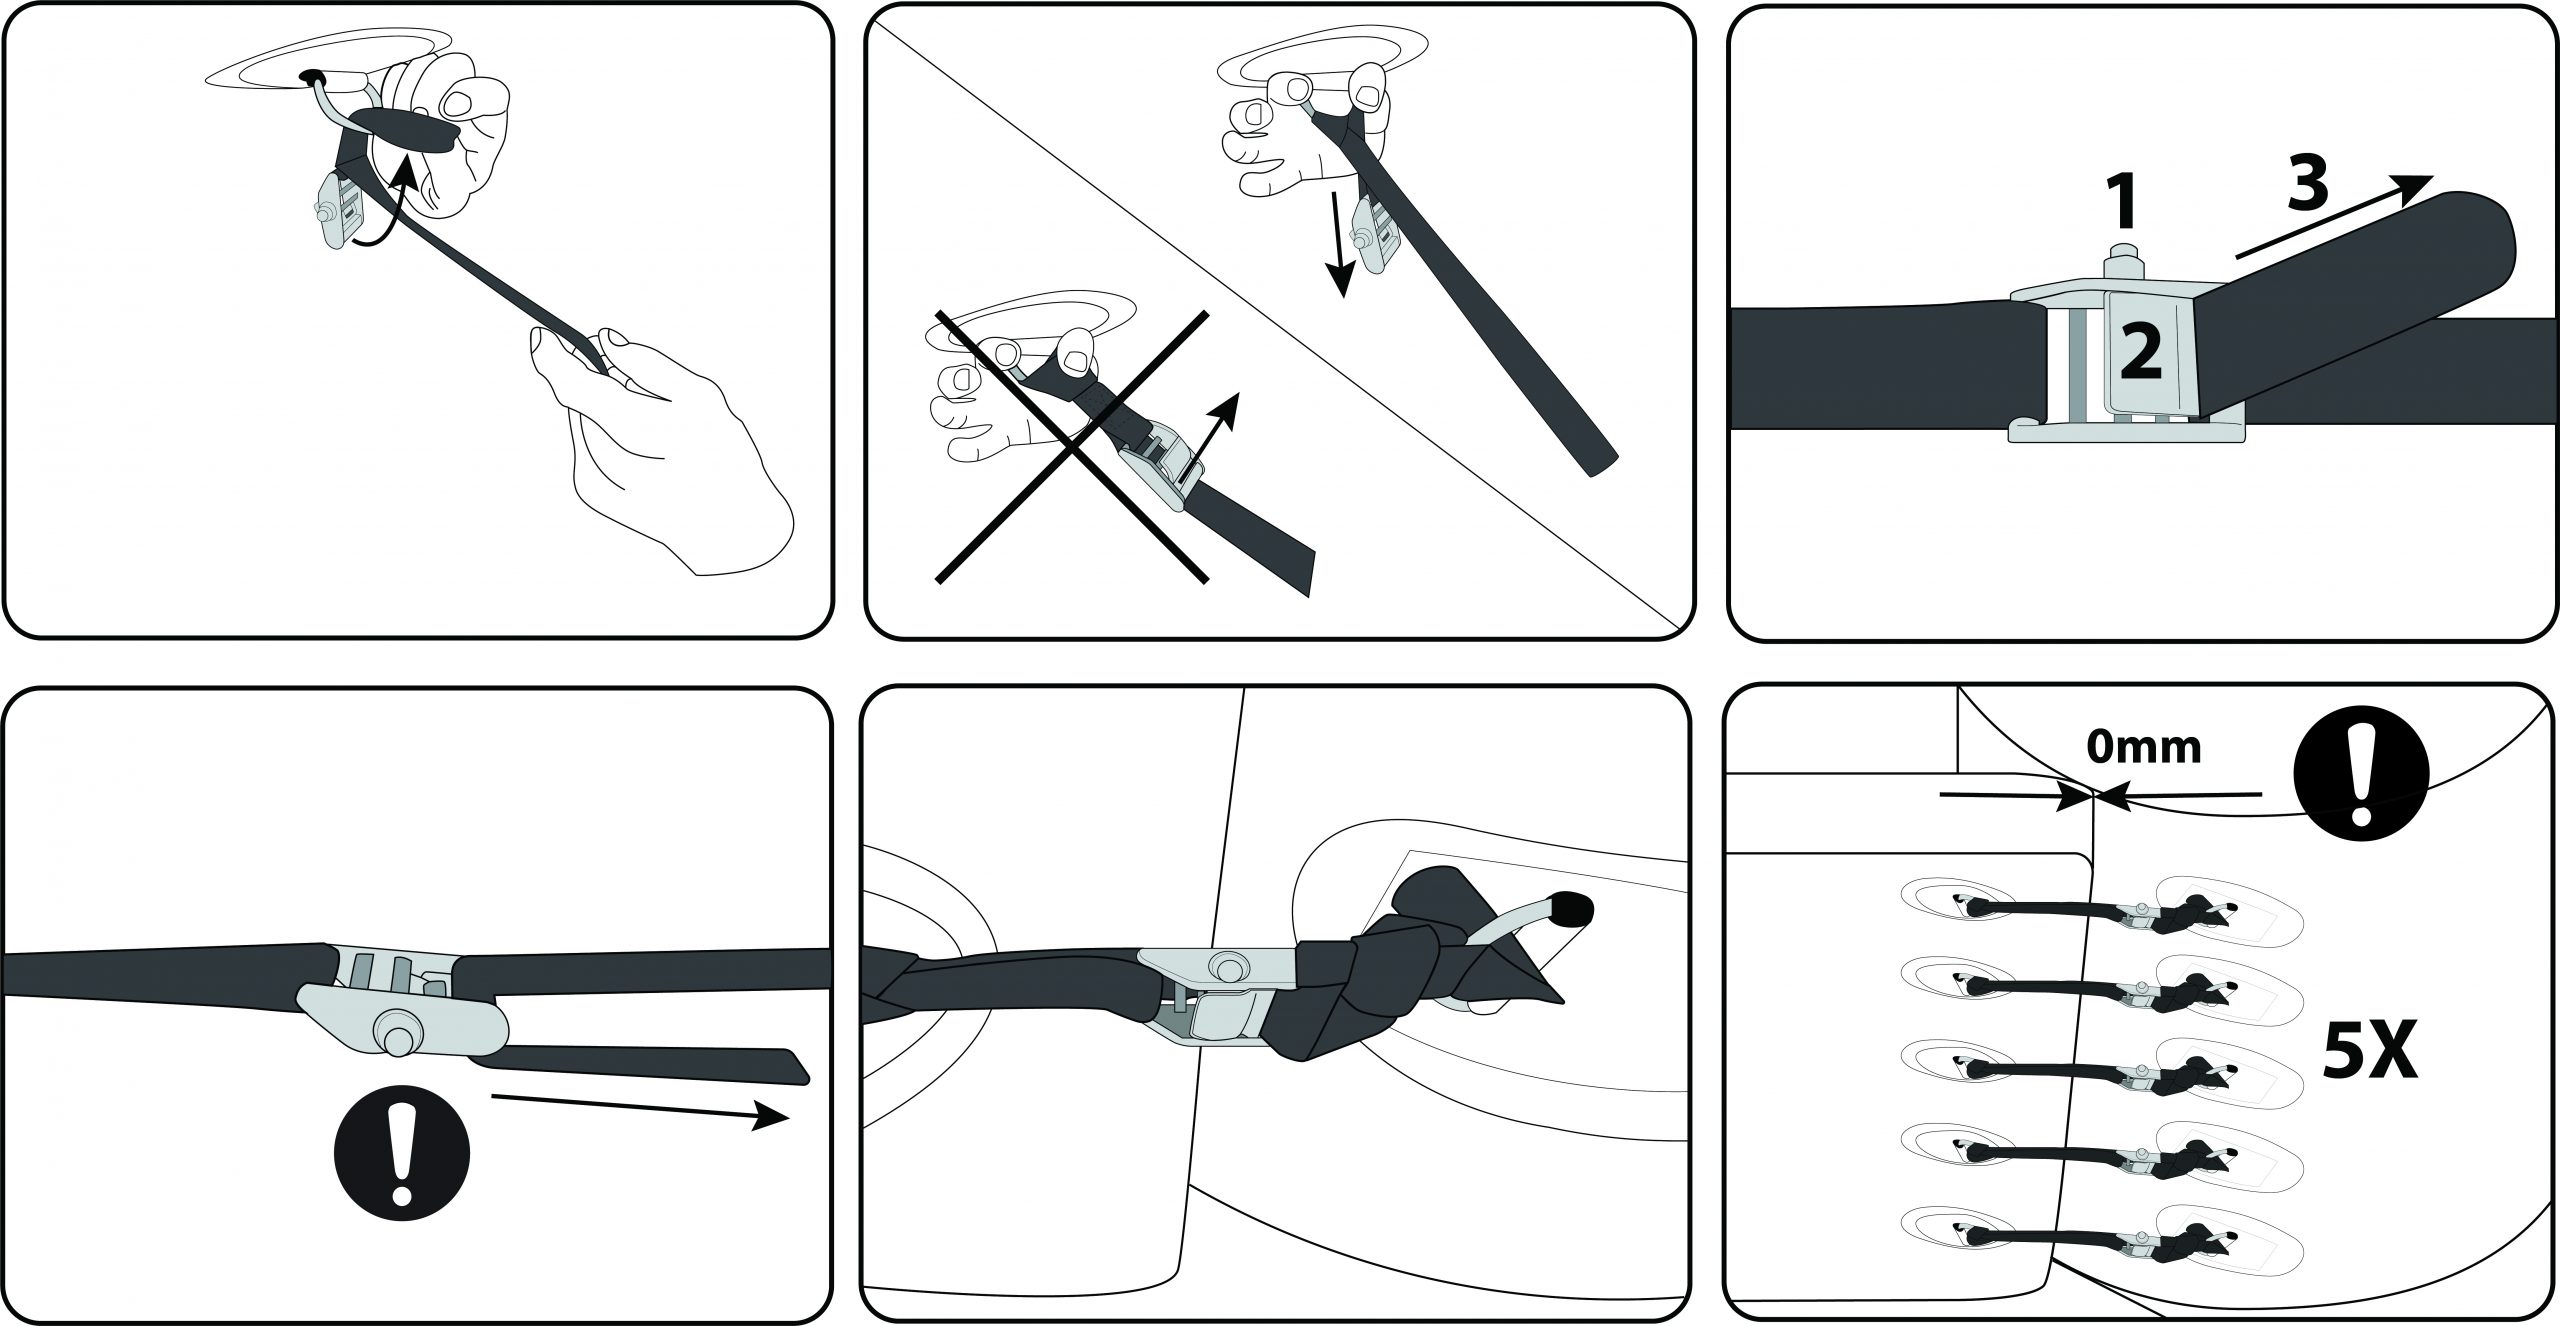
How to connect two aquapark products
1. Straps should first be attached to ‘Connector’ items (example: Swimstep, Splashmat, Speedway, Breezeway or Deck) only where a connection is needed. Your configuration determines how many straps are needed.
2. ‘Connector’ items generally go between or attach to feature items. Connectors should not be attached to other connectors.
3. Use all available rings to make connection. Standard connections use 5 rings. Some items use 3 or occasionally 7 rings/ straps.
4. After launch, float ‘Connector’ with necessary straps attached into desired position. Note: a matching set of connecting rings is required on feature item.
5. Attach center strap to center ring on feature item. Connect loosely, then work outward until all straps are connected.
6. Dive beneath to tighten all straps securely. Dive mask and several attempts may be required. Make sure connection is tight and there is NO GAP between items. Failure to connect items properly may result in injury or death.
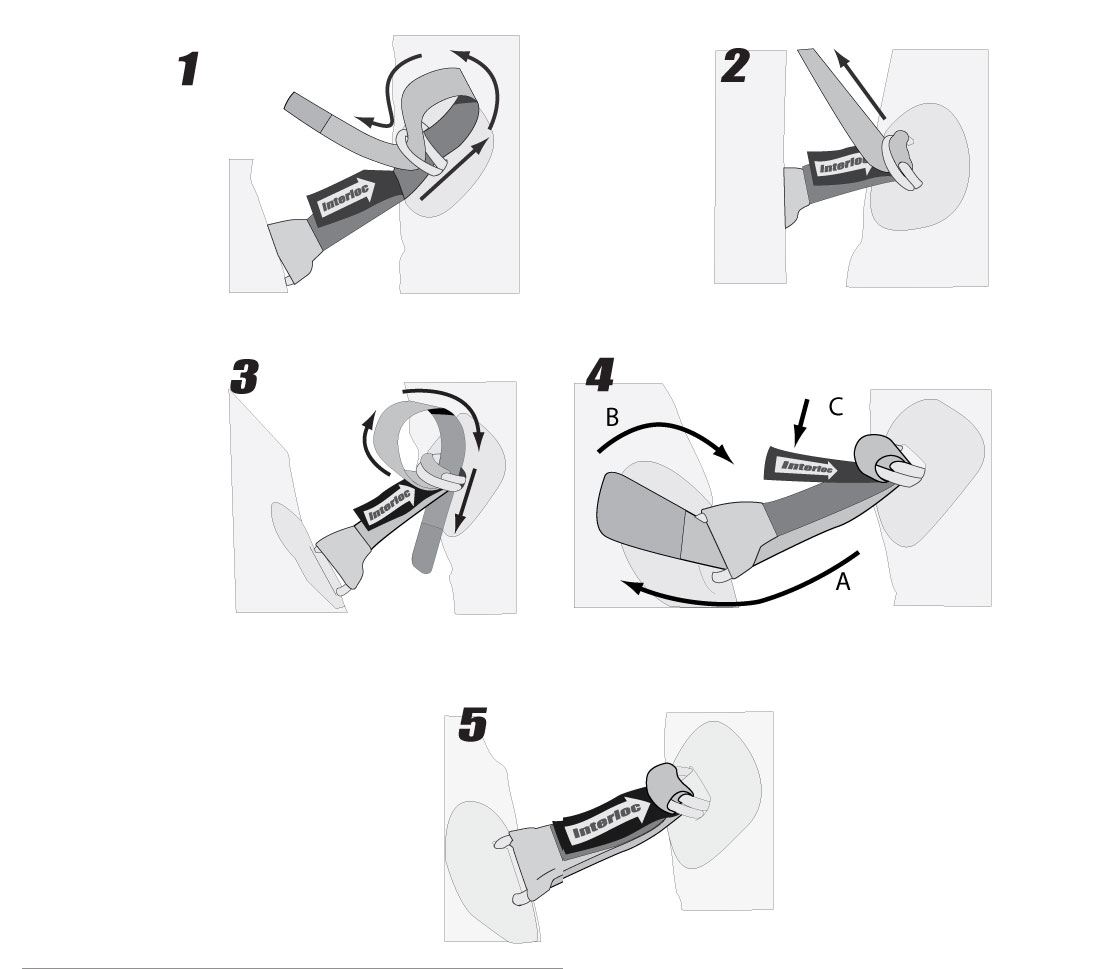
A.) INTERLOC SYSTEM
B.) INTERLOC STRAP
How to repair Aquapark items
How to replace the valve
– Completely fill air chamber that needs the valve replacement.
– Using a valve tool, loosen the valve by turning counter clockwise (Do not completely remove the valve or the boot that holds the valve to the tube will drop inside the air chamber and will be extremely hard to retrieve) and place back over the valve patch.
– Deflate the tube. Press against the material to hold the boot on the inside of the air chamber. Unscrew the valve the rest of the way and remove. Screw the new valve into place and achieve a “hand tight” fit.
– Re-inflate the tube and use the valve tool to tighten the valve fully. How-to patch a leak
How to find a leak
1. Place the product in a safe place with no sharp objects (rocks, glass, etc).
2. Inflate the product as usual.
3. Inspect the valve. Make sure the valve plug is not the source of leaking air before inspecting the entire product.
4. Add a little liquid dish soap to a spray bottle of warm water. Mix thoroughly to ensure that you can get an even amount of soap across the whole mattress.
5. Spray around the valve first. Escaping air will cause bubbles to form on the surface.
6. Spray the surface of the product systematically. Start with the seams, followed by the rest of the product.
7. Mark the leak with a marker once you locate it.
How to patch a leak
– Locate tear or hole and mark its location.
– Cut correct type of fabric patch with round corners allowing a minimum 5cm overlap around the hole/tear.
– Place the patch over the hole and mark around the patch with a pencil/removable marker pen.
– Clean/prime the rear of the patch and also the area needing repair, using a clean dry lint-free cloth, by wiping with Acetone. Wait until all of the Acetone has evaporated. (PVC will become tacky).
– Mask the area to be repaired with masking tape to avoid unsightly adhesive overspill when applying the adhesive.
– Ensure to allow a 3mm/1/8”gap around the pencil mark to allow for stretch in the patch when applied.
– Mix the adhesives as per the instructions that were supplied with the adhesives.
– Using a brush, apply an even, thin coat of adhesive to both the rear of the external device patch and the masked repair area, leave to dry for at least 20 minutes, apply a second and third coat, leaving each coat to dry for 2 minutes or until tacky, apply the patch carefully to the repair area.
– Smooth down the patch firmly using a seam roller or rounded object, working from the centre of the patch outwards, in order to remove air bubbles and ensure good contact.
– If the patch is not sticking in areas or air bubbles remain, then the area can be gently heated with a hot air gun or hairdryer and ‘re-worked.
– Remove the masking tape and clean off any excess adhesive with the Acetone to prevent unsightly brown stains.
– Place a smooth sided heavy weight on the patch and allow to ’cure’ for 24hours before reinflating to check that the repair has been successful and before re-launching the platform or device.
Maintenance
Before storing your aquapark, be sure to clean and dry it before deflating it.
Maintenance Guidelines
Cleaning
To clean, we advise to use a very soft bristle brush or sponge with warm water and an environmentally friendly, biodegradable soap. Rinse with cold fresh water and allow to dry fully before packing and storing.
Storage
– Avoid storing aquapark items whilst it is damp. It needs to be fully dry to prevent mildew forming and stop it from smelling unpleasant.
– Always store your aquapark elements in its designated bag.
A large wooden or plastic bin is also suitable for storing aquapark elements.
– Never store your aquapark elements near chemicals or corrosive products.
Documents
- AG Bouncer Manual
- AG Catapult Manual
- AG Delta Manual
- AG Freefall Extreme Manual
- AG Jungle Joe 2 Manual
- AG King of the Mountain Manual
- AG Ocean Pool Manual
- AG Rebound slide manual
- AG Revolution Manual
- AG Rockit Manual
- AG Escalade – 2m Manual
- AG Escalade – 3m manual
- AG 4x4m pool manual
- AG 6x5m Pool Manual
- AG Airport classic manual
- AG Blast Manual
- AG Foxtrot Manual
- AG Freefall 6 Manual
- AG I-Log Manual
- AG Jungle Jim Manual
- AG Runway Manual
- AG Sierra Manual
- AG Speedway 10′ Manual
- AG Swimstep Manual
- AG Swimstep XL Manual
- AG Walk on water manual
- AG Speedway 20′ Manual
- Bravo pump manual
Safety
General safety information
– Familiarize yourself with all applicable federal, state, and local laws, the risks inherent in the sport, and the proper use of the equipment.
– Know the waterways.
– Use caution and common sense.
– Do not attempt or allow somersaults. Landing on the head or neck can cause serious injury, paralysis or death.
– Never use at night, or in low-light conditions.
– Never use in poor weather conditions with excessive wind, waves or lightning.
– Do not use on dry land.
– Do no use without proper anchoring.
– Do not dive head first or swim under.
– Take extreme care when swimming between the shore and the product. Be cautious of any boat traffic or other obstructions. Ensure all users are capable swimmers and are not excessively fatigued. Do not allow anyone to attempt to swim to or from the product that are not physically able to do so.
– Always ensure that the swimming area around the product is free of submerged logs, rocks and sandbars. Ask about the local water conditions before use.
– Only allow use of the product with proper supervision. Secure the product when not in use to prevent access by any other users.
– Do not use in water where there are sharks or other animals that could pose a threat to humans.
– Always remove personal items such as rings, watches or other sharp objects before use.
Need help?
Ask for support
Reach out for personalized quotations or special arrangements.
Emailsales@oceanpremium.comPhone
+33 766 61 81 92
Send an inquiry instead
Alternatively fill out the form and send us an inquiry. We will come back to you the old fashioned way. In a flash!
Subscribe to our Newsletter
Stay informed
Receive Special offers and stay informed about the latest developments in the world of Water Toys.
In order to understand how we use and protect your personal information, please read our privacy policy.
Water toy rentals. Both sides of The Atlantic
We deliver. Anytime. Anywhere.
Trusted By


Ocean Premium has been supporting yachts and charter brokers with water toy rentals for over a decade. Constantly improving on the feedback of our clients and partners gives us the edge to excel at what we do. Several hundred yachts we work with continuously prove this.

Ships Worldwide

Best Prices

Need Advice